Friday, December 31, 2010

Mexican Hot Chocolate Cookies

When I went to see the Martha Show for to tweet at her cookie special, one of the cookies she made were Mexican Hot Chocolate cookies. The boyfriend (who was most certainly not there) could not stop talking about them. When I tried them at the show, they were good, but there was nothing really Mexican about them, no kick, and I am pretty sure that they left out the chili pepper, because a large crowd, not everyone likes chili, etc. So I made them my way, and they were fantastic! You can't really taste the chili, but it has a little bite to it. The cookies remind me so much of a glass of hot chocolate, I think it's the texture. They were a big hit as part of my Christmas Cookie tray and definitely my favorite of the bunch!


Mexican Hot Chocolate Cookies:
1 cup of unsalted butter, room temperature
2 cups sugar, divided
2 eggs
1 tsp of vanilla extract
2 1/4 cups of flour
1/2 cup of unsweetened cocoa powder
2 tsp of cream of tartar
1 tsp of baking soda
1 tsp of salt
1 tsp of instant coffee
3 tsp of cinnamon, divided
1 1/2 tsp of chili powder, divided

Pre-heat the oven to 400 degrees, position racks in the upper and lower thirds of the oven. Line baking sheets with parchment paper. In a large bowl, cream together butter and 1 3/4 cups of sugar until smooth and creamy. Add eggs and vanilla and beat until combined. Add the cocoa, cream of tartar, baking soda, salt, coffee, 1 tsp of cinnamon, 1/2 tsp of chili powder, and 1/4 cup of flour. Mix until everything is incorporated. Add additional cup of flour, and mix until flour is incorporated, repeat with last cup of flour. In a small bowl mix remaining sugar with 2 tsp of cinnamon and 1 tsp of chili powder. Scoop dough by tablespoon, roll it into a ball and roll it in the sugar mixture, then place on the baking sheet, repeat. Place the cookies about 3 inches apart, they spread. Put the first cookie sheet in the oven on the upper level and bake there for 5 minutes. Meanwhile, repeat the cookie assembly process and fill another cookie sheet. When the first set of cookies has been in the oven 5 minutes, transfer that sheet to the lower portion, rotating the tray and place the unbaked tray on the upper rack. Bake for 5 minutes, then remove the lower sheet from the oven and move the upper sheet to the lower rack. Allow cookies to cool a few minutes before removing from sheets. Repeat this process until the dough is all gone. (recipe adapted from Martha Stewart)

Here is a picture of the Christmas Cookie Tray, the Hot Chocolate Cookies are at the top right, my sea salt chocolate chip cookies are right below that, The Ginger Bread Men recipe is from Martha, they are really spiced! And those biscotti will be coming soon to a blog near you...


Happy Eating.


StumbleUpon

Wednesday, December 29, 2010

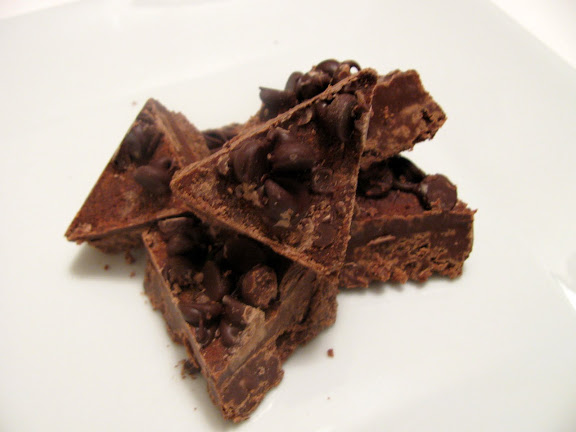
Chocolate Fudge

I recently bought a new candy thermometer, because I seem to have misplaced my old one. Since then, I have been on a candy making kick and I am loving it! Some stuff just tastes better when you make it yourself! So I decided I would make fudge. Growing up going to the Jersey Shore (fudge and taffy central) I have very high standards, but I have to say this stuff is delicious and highly addictive, so much so that I made it twice. The first time I made it I topped it with chocolate chips, after it turned out so well, I made a second batch and made this batch with toasted walnuts mixed in. I liked the walnut batch better, but I really love walnuts. Before eating the fudge, I recommend bringing it back to room temperature (although it tastes good cold too). If you can make it last, it tastes even better the second day (I am serious), after sitting out (in a sealed container, of course) all night it was so creamy and amazing. It also makes a wonderful gift, if you can bare to part with it that is. This recipe makes a ton though, so you can easily share and keep some for yourself. The fudge will keep for about a week in a sealed container or plastic bag.


Chocolate Fudge:
1 cups of dark brown sugar
1 cup of white sugar
1 14-ounce can of sweetened condensed milk
3/4 cup of heavy cream
6 tablespoons of unsalted butter
1 teaspoon salt
6 oz of semisweet chocolate
8 oz of bittersweet chocolate
3 cups of mini marshmallows
2 tsp of vanilla extract
2 cups of chocolate chips or toasted walnuts (optional)

Cover a 11 by 7 inch casserole dish with tinfoil. In a large pot, over medium-low heat, combine sugars, milk, cream, butter and salt. Cook until butter is completely melted and sugar is dissolved, you can check this by rubbing the mixture between your fingers, when you don't feel any granules the sugar is dissolved. This ensures your fudge is smooth. Turn heat to high and bring to a boil. Attach a candy thermometer. Reduce heat to keep mixture at a simmer, and cook, stirring occasionally until the candy thermometer reaches 234 degrees, soft ball stage. While the mixture is cooking, break the chocolate into pieces and put in a large heat proof bowl, add the marshmallows and vanilla to the bowl. When the sugar mixture is cooked, remove from heat and pour over the chocolate. Stir with a heat proof spoon until all the chocolate and marshmallows have melted and the mixture thickens (it will look a little like ground beef). If using walnuts stir them in now. Dump the mixture into the tinfoiled dish, and using the spoon press down to smooth and even out the mixture. If using chocolate chips, sprinkle with chips now and then press down lightly. Put fudge in the fridge for at least 3 hours. When fudge is cooled, use tinfoil to remove from pan and cut into pieces. Let return to room temperature before eating.

Happy Eating.


StumbleUpon

Monday, December 27, 2010

Butterflied Leg of Lamb

Welcome to the limbo sort of week in between Christmas and New Years, a perfect time to relax and catch up on some cooking. I have cookies, and meats, and treats I made with my wonderful new kitchen toys! To start it off, some succulent and delicious lamb. This lamb is a boneless butterflied leg of lamb, a cut of meat that I had never used before, because it's on the small side and a bit pricey. But it is worth it. It is only the best, juiciest piece of the leg, cut like a steak, and with just a bit of fat. It cooks beautifully, and tastes like a magical mix of lamb and steak. I served it up with asparagus (recipe below the lamb one) and white rice, mixed with feta cheese, a splash of chipotle olive oil, and a sprinkle of toasted almond slices.


Lamb:
1 lb of butterflied boneless leg of lamb
1 tsp of salt
1 tsp of pepper
1/2 tsp of dried thyme
1/2 tsp of paprika
1 clove of garlic
1 small shallot
1 tbsp of olive oil

Pre heat the oven to 350 degrees. Line a baking sheet with foil and grease lightly with olive oil. Wash the lamb and pat dry. In a small bowl mix together the salt, pepper, thyme and paprika. Rub onto the lamb on both sides. Heat the olive oil over medium-high heat. Mince the garlic and shallot and add to the oil. When the oil is sizzling, put the lamb in the pan, fattier side down. Cook until the side is brown, 2-3 minutes. Flip the lamb over and brown on the other side, an additional 2 minutes. Transfer to the baking sheet and cook in the oven until desired doneness. About 8 minutes for medium rare. Let sit for a few minutes before slicing and serving.


Asparagus:
1 bunch of asparagus
1 medium shallot
1/2 tsp of salt
1/2 tsp of pepper
1/2 tsp of paprika
2 tbsp of sliced almonds
1 tbsp of olive oil

Pre heat the oven to 350 degrees. Wash and trip asparagus. Spread out on a foil lined cookie sheet. drizzle with olive oil. Sprinkle with salt, pepper and paprika. Cook for 15 minutes until asparagus are tender. Remove from oven and top with almonds, return to the oven and cook until the nuts are golden, about 5 minutes. Serve and enjoy.

Happy Eating.


StumbleUpon

Wednesday, December 22, 2010

French Macaroons

I have always wanted to make French Macaroons. They are so glamorous. Petite, beautiful and decadent sandwiches. So I decided to try it. I hunted down almond flour and caster sugar, I found my old piping equipment (from my caking phase) and replaced the missing piece that I needed. I researched a variety of very similar recipes and then I just went for it. I decided to decadent it up a bit by making them chocolate and filling them with dulce de leche (which I have also wanted to make for awhile). My piping skills could definitely use some practice, but overall, these came out delicious and beautiful. The cookies are so light and crisp, but so rich in flavor. It's like the perfect contradiction, and the filling, well there is no other way to describe that besides yum! I am so proud of my little beauties, even though my boyfriend kept calling them mini chocolate hamburgers. Oh well, I can sort of see what he means... I only kept a few of these for myself (for research/taste testing purposes) I packaged the rest up as a little gift for a friend, after all, the best part of baking is sharing!


Chocolate Macaroons:
1 cup powdered sugar
1/2 cup almond flour
3 tbsp of dutch process cocoa
2 large egg whites
1/4 tsp of cream of tartar
1/4 cup caster sugar

Allow egg whites to sit out on the counter until they are room temperature, longer is ok, I let mine site for 2 hours. Sift powdered sugar, almond flour and cocoa into a medium bowl. Stir gently, then sift the mixture again. Pre-heat the oven to 375 degrees. In a large bowl, using a hand or stand mixer and the whisk attachment, beat egg whites until foamy on medium speed, about a minute. Add the cream of tarter and beat until soft peaks form, about 2-3 minutes. Add in caster sugar and beat on low until stiff peaks form, about 8 minutes (I just timed mine for exactly 8 minutes). Sift flour mixture over egg whites, then stir with a spoon until just combined. Spoon mixture into a pastry bag with a 1/2 inch round tip. Line a baking sheet with parchment paper. Pipe small circles 1/2 inch apart. Try to make them all as close to the same size as possible. Tap the sheet next to each cookie, to release any air bubbles. Let the cookies sit out for 15 minutes. Transfer cookies to the oven and reduce temperature to 325 degrees. Cook for 5 minutes, then rotate the baking sheet and cook for an additional 5 minutes. n the meantime, pipe the next set of cookies on to a new sheet of parchment paper (since they need to sit for 15 minutes), I found it easier to pipe the cookies if they weren't on the baking sheet. Remove the cookie sheet from the oven and increase the oven temperature to 375 degrees. Let cooked macaroons cool for 5 minutes, then loosen them from the wax paper. Transfer the piped but uncooked macaroons (that had been sitting out) onto the baking sheet and into the oven. Repeat this process until all the cookies are cooked and cooled. (adapted from Martha Stewart)


Dulce De Leche:
1 14 oz can of sweetened condensed milk

Pout the milk into a medium pot and bring to a boil. Reduce heat to medium-low and cook, stirring frequently until thickened and caramel in color, about 20-25 minutes. Yes, that is how easy it is to make dulce de leche, when someone told me this, I could not believe it, given what they charge for a jar of that stuff! I just had to see for myself, and let's just say I'll never buy a jar again! This stuff is delicious and so easy to make. Cook it shorter if you want it more like a caramel sauce and longer if you want to make a taffy/caramel like concoction.


Allow the cookies to cool completely, but have the dulce de leche slightly warm (you can touch it with your fingers, and it doesn't burn). Pair the cookies up by how similarly shaped and sized they are. Scoop a small spoonful of dulce de leche onto one cookie, and place the other cookie on top. Repeat until all the cookies are paired off and sandwiched up. Serve immediately or Save them for later, they are amazing either way!


Happy Eating.


StumbleUpon

Monday, December 20, 2010

Chicken Thighs with Lemon-Sherry Pan Sauce

Chicken thighs are amazing. Just as versatile as the chicken breast, but 1000 times more flavorful and juicy. Lately I have been bulk buying them instead of the standard breasts and subbing them into all kinds of delicious chicken creations. This one was a particular winner, warm and satisfying in the extremely cold December that is currently plaguing my existence (either be warmer or snow, come on weather). I'll admit this dish was probably very "winter" because I served it with the Saffron Risotto I made shortly after returning from Argentina. If I thought that was delicious last time, it was nothing compared to coming in from arctic temperatures to something hot, creamy and oh so soothing. But, back to the chicken, and my favorite flavor combination: lemon, sherry and black pepper.


Chicken Thighs and Lemon-Sherry Sauce:
1 lb of boneless skinless chicken thighs
1 tbsp of olive oil
1 tsp of salt
1 1/2 tsp of pepper, divided
1/2 tsp of nutmeg
1/2 a lemon
1/4 cup of sherry
1 tbsp of butter
1 tbsp of flour
1/2 cup of chicken stock

Pre-heat the oven to 350 degrees. Heat the oil in a medium skillet over medium-high heat. Mix together the salt, 1 tsp of pepper, and nutmeg. Sprinkle the seasoning on both sides of the thighs. Squeeze the juice of half the lemon onto the chicken, reserve the rind. Put chicken, fattier side down, into the pan. Brown on both sides, about 2-3 minutes per side. Transfer chicken to a baking sheet and cook in the oven until cooked thoroughly, about 15 minutes. Pour the sherry into the pan and scrape up any brown bits the chicken left behind. Allow sherry to reduce, about 3 minutes. Add butter to the pan and melt, whisk in flour. Cut reserved lemon peel into chunks and add to the pan. Pour in stock and whisk together. Bring to a boil and then reduce to a simmer. Stir in remaining pepper and allow sauce to thicken. Serve chicken with about a tsp of sauce smeared onto it.

Happy Eating.


StumbleUpon

Thursday, December 16, 2010

Pumpkin Cake with Maple Buttercream

This might be the most delicious cake I have ever created. For his birthday, the boyfriend wanted a cake that had no vanilla or chocolate flavored anything. Thanks, Mr. Difficult. So I got a little creative and a lot seasonal. The pumpkin in the cake keeps it ridiculously moist and so scrumptious. The frosting, I have to say, was one of the hardest things I have ever made. (It's real buttercream, the kind you make with egg yolks, yum.) Mostly because I don't have a stand mixer (only a lowly hand one) and I was also trying to check on the cake at the same time I was making the frosting, which was already a two had job. Needless to say I also frosted myself and a good portion of the kitchen, but it was totally worth it. Sorry that I don't have a picture of the slice or the inside, but I turned around for a second and the cake was gone, I didn't even get a slice! (Don't worry I stole a bite from the birthday boy to taste test, it passes.) But anyway, without further ado...


Pumpkin Cake:

2 sticks of unsalted butter, softened slightly
2 cups of white sugar
1 cup of brown sugar
4 large eggs
1 tsp vanilla extract
2 cups of canned Pumpkin
1 cup warm of half and half
3 1/3 cups of flour
2 tsp of cinnamon
1 tsp of nutmeg
1/2 tsp of ground cloves
1/2 tsp of ginger
1 tsp salt
1 tsp baking powder
1 tsp baking soda

Pre-heat the oven to 350 degrees. Beat together the butter and both sugars in a large bowl, until well combined and fluffy. Add eggs and vanilla and mix until well incorporated. Add in pumpkin and half and half and stir until just combined. Add in cinnamon, nutmeg, cloves, ginger, salt, baking powder, baking soda and 1 cup of flour. Mix until just combined. Add in an additional cup of flour and mix in. Add remaining flour and mix until just combined, do not over mix. Grease two 9 inch cake pans, and pour batter evenly between them. Bake until a fork inserted in one comes out clean, about an hour. Allow cakes to cool before frosting. (adapted from Martha Stewart)

Maple Buttercream:

6 egg yolks
2 cups pure maple syrup, grade A dark amber
4 sticks of unsalted butter, chilled

Cut butter into small pieces and keep in the refrigerator until ready for use. Heat maple syrup over medium-high heat. Bring to a boil and then cook until a candy thermometer registers 240 degrees, about 15 minutes. While the syrup is cooking, beat the egg yolks in a large bowl on high speed until very fluffy. When syrup is done, remove from heat, and while the mixer is running (this is where a stand mixer would come in handy) pour the syrup down the side of the bowl so that it its the glass before the egg yolks, this prevents splashing and ensures even consistency. Beat until the syrup is incorporated and the bowl is just warm, about 7 minutes. Switch the mixer to the the whisk attachment. Add in the butter a few pieces at a time while beating constantly on medium high speed. Beat until all the butter is incorporated and the mixture is light and looks like frosting. Either frost the cake immediately or refrigerate the frosting while you aren't using it (you will need to re-whisk the frosting a bit, if you refrigerate it). After frosting the cake, serve immediately or refrigerated until you are ready to serve it. The frosting does not keep if it gets warm, so the cake must be refrigerated. For tips for frosting the cake smoothly, see my Red Velvet Cake post. Serve and enjoy! (from Martha Stewart)

Happy Eating.


StumbleUpon

Tuesday, December 14, 2010

Roasted Pepper Chili

It is absolutely freezing outside. Like beyond cold. And all I can think about is soups and stews and hot spicy food. All thoughts of ice cream and sushi have vanished from my mind and I just want anything hot you can eat with a spoon. My hot chocolate consumption has gone through the roof and I spent a week thinking about chili. So finally I decided I couldn't wait any longer, I had to have some. I went to the veggie section of my local Wegmans and I was overwhelmed by the variety of peppers. Every kind you could possibly imagine and a few I had never heard of. As Bobby Flay's advice danced in my head, I decided on Poblano, Anaheim and the classic jalapeño to make a delicious 3 pepper-roasted chili.


Roasted Pepper Chili:
1 Poblano pepper
2 Anaheim peppers
2 jalapeño peppers
1 small green pepper
2 Tbsp of olive oil
2 small onions
3 clove of garlic
1 pound ground turkey or beef
15 oz can of tomato sauce
15 oz can of black beans
15 oz can of white beans
23 oz can of peeled whole tomatoes
6 oz of Tomato Paste
1 tbsp of Cumin
1/2 tsp of paprika
2 tsp of salt
1 tsp black pepper

Pre-heat the broiler. Wash the peppers and cut off the top stems. Put on a foil lined baking sheet and drizzle with 1 tbsp of olive oil. Roast the peppers, flipping them once halfway, until they are charred slightly, about 15 minutes. Let peppers cool until you can handle them. Heat 1 tbsp of olive oil in a large pot over medium heat. Dice onions and garlic. Add to the pot and allow to cook until translucent and soft, about 8 minutes. Add in ground turkey (or beef) and cook stirring occasionally to brown the meat. Remove the charred skin from the peppers and dice them. Add the peppers to the pot and stir everything together. Add in tomato sauce and drained beans (discard the liquid). Add in the whole tomatoes and their juices. Use a spoon to stir everything together and break apart the tomatoes into chunks. Add the tomato paste and seasonings and bring everything to a boil. Reduce to medium-low and cook covered for about an hour (or longer). Serve with cheese, sour cream, avocado, or whatever your favorite chili toppings are.


Happy Eating.


StumbleUpon

Friday, December 10, 2010

Pumpkin Pie

I love pie. In fact, I am pie obsessed. It's my favorite dessert. I have been on quite a pie kick for the past year. In fact, that Red Velvet Cake I made a few weeks ago was the first (what I like to call) fancy cake I had made in a few years, because of how pie obsessed I've become. Pie is so versatile, but I am usually a fruit pie kind of gal. My absolute favorite is cherry, I think that is because it's the only kind I don't make myself (the thought of pitting all those cherries is really daunting). But, as it is the season for all things Pumpkin and spice, and a special request was made, I decided to make a lovely, delicious pumpkin pie. For the crust, I went back to my favorite the Williams-Sonoma basic pie dough, this is an all butter, absolutely heavenly crust. Because I had 2 different 10 inch pies to make (the other pie will be coming soon, and it is a fruit-tastic pie), I tripled the recipe and I had a little dough leftover. You can use the leftover dough to make yourself little pie-let snacks (so yum!).


Pumpkin Pie:
1 1/2 cups of canned pumpkin
4 large eggs
1 tbsp of heavy cream
3/4 cup of brown sugar
1 tbsp of cornstarch
1 tsp of salt
2 tsp of cinnamon
1 tsp ground ginger
1/2 tsp of nutmeg
1/2 tsp of ground cloves
1 teaspoon pure vanilla extract
1 1/2 cups of evaporated milk

Pre-heat the oven to 425 degrees. Roll out a pie crust and fit to a 10 inch pie pan. Fill pie with dried beans or pie weights. Whisk together 1 egg and the heavy cream. Brush the exposed areas of the crust with the cream mixture. Bake the pie for 15 minutes, remove beans and bake until golden, about another 15 minutes. Let pie crust cool. Reduce oven temperature to 350 degrees. In a large bowl mix together pumpkin, sugar and 3 eggs until well combined. Add in te cornstarch, salt, cinnamon, ginger, nutmeg, cloves, vanilla and milk until smooth and incorporated. Pour into the cooled pie shell and bake until just set in the middle, 25 to 30 minutes. Let cool completely before serving, or refrigerated and serve chilled. (adapted from Martha Stewart)

Happy Eating.


StumbleUpon

Wednesday, December 8, 2010

French Toast Bread Pudding

This, I am sad to say, is the last of my brunch posts. You might be sick of my breakfast items, but breakfast is my favorite meal and I could read (and write) about it all day long! You might say, I saved the best for last, the sweet star of the day (although I'm not sure all my party goers would agree) but this is my blog and this was my favorite of the day. Combining a few of my favorite things (Challah, maple syrup, and pudding) into one opulent, decadent, ridiculously easy to make, breakfast sensation. French toast bread pudding. Need I say more.


French Toast Bread Pudding:
1 Raisin Challah or brioche (about 16 oz of bread)
7 eggs
2 cups of 2% milk
1/2 cup of half and half
1/2 cup of brown sugar
1 tbsp of vanilla extract
1/2 cup of raisins
2 bananas, sliced
1 tsp of nutmeg
1 cup of pecans
1/4 cup of maple syrup, plus more for serving

Grease a large baking dish. Rip or cut challah into bite size chunks and place into dish, sprinkle in raisins and bananas. In a large bowl, whisk eggs, milk, half and half, sugar and vanilla until well combined and creamy. Pour over bread and push down on bread so that everything gets covered in the egg mixture. Cover with tinfoil and refrigerate OVERNIGHT. In the morning, pre-heat the oven to 350 degrees, cook covered for 30 minutes, then remove foil and cook uncovered until puffed and golden and slightly crusty, about 30 minutes. In a large pan, over medium heat, heat pecans and maple syrup, stirring so all the nuts are coated. Cook until nuts are toasted and aromatic, about 5 minutes. Sprinkle nuts on top of the bread pudding. Serve warm, with maple syrup on the side. (adapted from Epicurious)


Happy Eating.


StumbleUpon

Monday, December 6, 2010

The Bread Basket

What is my absolute favorite part of a Brunch buffet? The bread basket. A delicious assortment of freshed baked goodness. To be fair, bread is pretty much my favorite food, so this is kind of a no-brainer. Obviously, when I was hosting my little brunch soiree, I had to make a basket (or tray) for myself (and my guests). My "basket" consisted of blueberry muffins, pumpkin bread, biscuits, and Challah bread. The Challah was from a local bakery, but the other three I whipped up. I served my basket (well the Challah and biscuits really) with butter and the peach-blueberry jam I made this summer. The basket was a big hit, and it was definitely my favorite part of the meal.


The Biscuits were straight from Martha, I am not a bread expert, and I very rarely use yeast, but these came out perfect! I halved the recipe (which made 12) and I will definitely be making these puffy, roll-like biscuits again. I made the dough the day before and refrigerated it overnight, instead of for 2 hours.


Next we have delicious, moist, wonderful pumpkin bread


Pumpkin Bread
1 1/2 sticks of unsalted butter
1 cup of sugar
1 cup of dark brown sugar
1 15 oz can of pumpkin
3 eggs
2 1/2 cups of flour
2 tsp baking powder
1/2 tsp of ginger
1 tsp of cinnamon
1 tsp of nutmeg
1/2 tsp of ground cloves
1 teaspoon salt

Pre-heat oven to 375 degrees. In a large bowl, melt butter. Mix in both sugars until combined and creamy. Add in pumpkin and eggs, beat until combined. Add in baking powder, spices, and 1/2 cup of flour, mix until just incorporated. Add an additional cup of flour, and mix until just incorporated, repeat with final cup of flour. Grease a large loaf pan and pour batter in. Bake until a fork inserted in comes out clean, about 1 hour and 15 minutes. Let cool for about 10 minutes in the pan, then invert pan to remove bread. Cut into slices (each slice can also be cut in half) to serve. (adapted from Martha Stewart)

Finally we have some delicious and bursting with fruity goodness, blueberry muffins


Blueberry Muffins:

1 stick of unsalted butter at room temperature
1 cups of sugar
1 tsp of vanilla extract
2 eggs
1/2 cup of half and half
2 cups of flour
1 tsp of nutmeg
1 1/2 tsp of baking powder
1 tsp salt
3 cups of blueberries
Additional sugar and nutmeg for sprinkling

Pre-heat the oven to 375 degrees. Beat the butter and sugar until creamy and smooth. Add in eggs and vanilla and mix until fluffy. Add in flour, nutmeg, salt and baking powder. Mix until just barely combined. Add in half and half and stir together gently. Mix in blueberries. Grease a muffin tin (recipe makes somewhere between 12 and 18 muffins) and distribute batter, filling the wells 3/4 full. Sprinkle each top with sugar and nutmeg. Bake until a fork inserted comes out clean and blueberries are bursting, about 25 minutes. Let cool for 5 minutes before removing from the pan. (adapted from Martha Stewart)

Happy Eating.


StumbleUpon

Thursday, December 2, 2010

Dinner Crew for Brunch

One of the fun things about the holidays is that all (well, most) the people you grew up with come home. As a girl who didn't stray to far from he childhood roots, this is the perfect opportunity to impress her childhood friends by playing hostess. In high school we had this lovely little tradition called dinner crew, where we would go out to dinner the night before a school day that wasn't (in service days, long weekend holidays, etc). In college we continued this tradition, getting together for dinner whenever a large number of us were home on break. Now post college, it's even harder to get everyone together, but over the Thanksgiving weekend we succeeded to get (almost) everyone together. So I hosted what I hope will be the first of many in a long standing tradition, dinner crew for brunch!


I cooked up a storm for this, and it's going to take me more than one post to share all the happiness and recipes with you, so here is a preview of things to come. Followed by some eggs and potatoes...


Mushroom, Leek and Goat Cheese Frittata:
1 large leek
2 medium shallots
1 lb (2 containers) of assorted mushrooms
1 tbsp of olive oil
10 eggs
1/2 cup of heavy cream
1/2 tsp of salt
1 tsp of pepper
4 oz (1 container) of soft goat cheese

Pre-heat the oven to 350 degrees. Heat olive oil in a large pan over medium heat. Slice leak and shallots. Add to the pan and cook until the leeks begin to get tender, about 5 minutes. Add mushrooms, breaking up and large pieces. Cook until mushrooms and tender, about 10 minutes. This part can be done the day before, put the cooked veggies in a plastic bag or some Tupperware in the fridge overnight. In a large bowl beat the eggs, cream, salt and pepper together until well combined and creamy. Stir in vegetables and crumble in goat cheese. Grease or Pam a 9 inch pan, I like to use a spring form pan, for easy removal. Pour the mixture into the pan. Place the pan on the stove top, cook over medium heat, moving the mixture around a few times, to allow the liquid eggs to run to the sides, like you would an omelet. Cook until it just begins to set, about 10 minutes. Transfer to the oven and bake until frittata is set in the center, about 30 minutes. Serve and enjoy.


Breakfast Potatoes:
3 lbs of yellow potatoes
2 large onions
1 medium shallot
2 tbsp of olive oil
1 cup of chicken stock
1 tsp of ground thyme
salt, pepper

Pre-heat the oven to 425. Chop the potatoes, onions, and shallot into small pieces. Heat olive oil in a large skillet over medium-high heat and add potatoes, onions, shallots, and thyme. Let cook for about 5 minutes, then add the stock. Cook covered until potatoes are tender, about 10 minutes. Salt and pepper to taste. Transfer to a baking dish and bake in the oven until potatoes are cooked through and crisp on the outside, about 10 minutes. Serve hot.

One more picture of the girls, so everyone who was there is included on the blog (don't want to leave anyone out)


So stay tuned for lots more delicious breakfast foods to come, and as always...

Happy Eating.


StumbleUpon

Monday, November 29, 2010

Red Velvet Cake

I hope everyone had a wonderful Thanksgiving. I certainly did, but in case you saved any room for dessert, or are already thinking ahead to the next set of holidays... I have some delicious red velvet cake for you. I never understood why these weren't more popular for Christmas, after all, they have the color scheme down. I chose to omit nuts from this one, because of the crowd it was for, but if your allergy-free pecans are the classic choice and it also tastes great with walnuts.


Red Velvet Cake:
2 1/2 cups of flour
1 1/2 of sugar
1 tsp of baking soda
1 1/2 tsp of salt
1 tbsp of cocoa powder
1 1/2 cups of vegetable oil
4 tbsp of cultured buttermilk powder
1 cup of warm water
2 large eggs
1 oz of red food coloring
1 tsp white distilled vinegar
1 tsp vanilla extract

Pre heat the oven to 350 degrees. In a large bowl whisk together buttermilk powder and water until well combined. Add vegetable oil, food coloring, vinegar, eggs and vanilla and stir together vigorously, or use a hand mixer on low speed, it is much easier to use the mixer if you have one because you have to create an emulsion. When the mixture is very well combined add in 1 1/2 cups of flour, the salt and baking soda mix by hand or mixer until the dry ingredients are just absorbed. Add in remaining flour and sugar and mix again until well combined. Pour batter into 2 non-stick 9 inch cake pans (or greased regular cake pans) bake until set in the middle and a toothpick inserted in the cake comes out clean, about 35 minutes. Try to test on the same cake each time you check it, then that one will be your bottom layer. Allow cake to cool completely before frosting. (adapted from Paula Deen)

Cream Cheese Frosting:
1 pound cream cheese, softened
2 sticks unsalted butter, softened
1 tsp vanilla extract
4 cups of confectioners sugar

In a large bowl mix together the butter, cream cheese, and vanilla extract using a hand or stand mixer until soft and creamy. Add in sugar 1 cup at a time, mixing after each addition. Increase speed on mixer and beat until light and fluffy. (from Paula Deen). To frost the cake, use a metal spatula to apply the frosting, all around. Then let the cake sit for 5 minutes. Clean the spatula and run it under hot water, and use it to smooth the frosting all around, cleaning and running under hot water every few strokes. This will give you a smooth and impressive cake, and make any decorating you want to do easy.


Happy Eating.


StumbleUpon

Wednesday, November 24, 2010

Butterfinger Rice Krispy Treats

This is definitely dessert season, and I am loving it. Everywhere you turn there are cakes, cookies, pies and other yummy treats. There are office parties, regular parties, potlucks and bake sales. So if you are looking for an easy, childhood flashback inducing, creatively delicious treat, I have one for you. A classic Rice Krispy treat, with a twist. Butterfingers! I made these bad boys with leftover Halloween candy (yes, I still have a ton) but you could use regular sized bars, if you didn't way over estimate the number of kids coming to your house. I cut these gigantic because they were for a bake sale. You could cut them smaller, but why would you want to?


Treats:
1 bag of mini marshmallows
4 1/2 tbsp of unsalted butter
9 cups of Rice Krispies
1/2 cup of mini chocolate chips
1 cup of chopped Butterfingers, about 15-20 mini candies.

Grease a 9" by 13" dish. In a medium pot over medium-low heat melt the butter. When the butter is completely melted add in the marshmallows and melt, stirring frequently until the mixture is smooth. Remove the pot from heat and mix in the Rice Krispies. Stir in the chocolate chips and butterfingers. Press the mixture into the dish until the mixture is spread evenly and there are no air bubbles. Let cool before cutting. This makes 12 huge Rice Krispie Treats (or more of a more normal sized treat). (adapted from the Original Treats recipe, the one on the cereal box)


Happy Eating.


StumbleUpon

Friday, November 19, 2010

Chicken and Udon Stir Fry

As I have said many times on here before, I love a good stir-fry. Quick and easy, yet delicious an exotic. Lately I have been obsessed with udon noodles. They are so different than other rice noodles, mainly because they are really thick. The sauce I use for stir-fries is usually a variation of this, you can switch Tereyaki for the soy, or use brown sugar or honey instead of maple syrup, or use different varieties of chili sauce to mix up the flavor. Likewise the protein and the veggies can be subbed with whatever your favorites or leftovers are.


Chicken and Udon Stir Fry:
1 Large boneless skinless chicken breast
1 8 oz package of Udon noodles
2 medium yellow onions
1 large green pepper
2 cloves of garlic
1 medium shallot
1/2 package of gourmet mixed mushrooms
1 tbsp of olive oil
1/4 cup of soy sauce
1 tbsp of maple syrup
2 tbsp of rice wine vinegar
1-3 tsp of Sriracha
Salt, Pepper

Make the Udon noodles according to package directions. In a large skillet or wok, heat the olive oil over medium heat. Cut onions into large slices or chunks and add to oil. Dice garlic and shallots and add to the pan as well. Cook for about 5 minutes, until onions are slightly tender, stirring to prevent burning. Chop the pepper and mushrooms to be a similar size to the onions and add to the pan as well. Slice chicken into thin pieces, season with salt and pepper lightly, and add to the pan. Cook, stirring frequently until veggies are tender and chicken is cooked through. In a small bowl whisk together soy sauce, maple syrup, vinegar and Sriracha to taste. Add the cooked Udon noodles to the pan and stir together, stir in sauce to taste. Serve and enjoy.

Happy Eating.


StumbleUpon

Wednesday, November 17, 2010

Back to Beef

I had not had steak since getting back from Argentina. First I was just over-steaked. I ate so much meat abroad, I couldn't even look at a cow. Then I was scared, what if I ruined my love of steak forever, by spending a week stuffing my face with the finest grass fed beef. But cravings can only be kept at bay for so long, so I did my best to minimize the American Beef shock, buy buying some beautiful steak and serving it up with fresh Chimichurri sauce. Chimichurri is a fresh herb and garlic sauce, it's tangy, a little spicy and absolutely magical. It will make any meat (or bread, or your best dipping finger) sing. With a great piece of steak, and some magical sauce, I am ready to be a meat eater again.


The steak is prepared very simply. Just a little salt and pepper, then pan-seared to medium rare. Serve it topped with the Chimichurri sauce (recipe below), or sauce on the side. This will work for virtually any cut of meat.


As you can see below, this makes a lot of sauce, but trust me that's a good thing. You can either have a whole bunch of people over for steaks, this would be great for grilled steaks as well (weather permitting) or if you are just having a cozy dinner for two (like myself) you can save the extra sauce to make a delicious marinade for something later in the week. I marinated a pork tenderloin, for a delicious and easy dinner the next night. I marinated the pork over night and then just roasted it in the oven, extremely easy and very delicious.


Chimichurri Sauce:
3 tbsp of red wine vinegar
2 tbsp of water
4 cloves of garlic
1 tsp of salt
2 tsp red pepper flakes
1 tsp pepper
1/4 cup of olive oil
1/2 cup of chopped parsley
1/4 cup of chopped cilantro
1/4 cup of olive oil

Mince garlic and put in a small bowl. Pour vinegar and water on top and stir to combine. Chop parsley and cilantro, so that it resembles a mushy paste. Add that to the garlic mixture. Add salt, pepper and red pepper flakes. Stir together then whisk in olive oil slowly. Adjust seasonings to taste. Allow mixture to sit at room temperature for at least 30 minutes before serving. (adapted from Epicurious)


Happy Eating.


StumbleUpon

Monday, November 15, 2010

Cornish Hens and Papas Bravas

What's better than a delicious roast meal? How about one that takes about 40 minutes to make. Even better, you don't have to share. Cornish hens are perfectly proportioned for individual serving. They are small so they roast in about 35 minutes, and the meat is succulent and tender. They are like extra concentrated chickens. In the summer, they are great on the grill, but it's a little cold now, so these bad boys were roasted. I served them with roasted potatoes and brava sauce. Brava sauce, from Papas Bravas (which is potatoes brava style) is a Spanish favorite of mine. Brava sauce, or salsa Brava is a spicy-tomatoey mayonnaise, that is usually served on crispy roast or fried potatoes. My sauce is probably not the most authentic (I used Sriracha), but it was delicious and definitely got the flavor right. This delicious dinner is perfect any night of the week, a perfect dinner for 2.


Lemon Sherry Cornish Hens:
2 Cornish hens, approximately 1 1/2 pound each
2 tbsp of olive oil
2 lemons
2 tsp of pepper
2 tsp of salt
Small handful of fresh thyme
1/2 cup of sherry wine
1/2 cup of low sodium chicken stock

Pre-heat the oven to 450 degrees. Remove giblets if there are any, wash the hens inside and out and pat dry. Rub each hen with 1 tbsp of olive oil. Salt and pepper the hens inside and out (about 1 tsp of each, for each hen). Squeeze the juice of half a lemon on each hen and put lemon half inside the neck cavity. Put a few sprigs of thyme inside the cavities as well. Put hens in the oven and roast for 10 minutes. Pour the sherry over the hens and roast an additional 10 minutes. Pour the stock over the hens and roast and additional 10-15 minutes, until the hens are golden on the outside and the meat is cooked to 180 degrees. Serve the hens whole, with pan drippings as gravy if desired.

Roast Potatoes and Brava Sauce:
5-6 medium golden potatoes
1 Large yellow onion
1 tbsp of olive oil
Salt, Pepper
For Sauce:
1/4 Mayonnaise
1 heaping tbsp of tomato paste
1 tsp of Sriracha or other hot sauce
1/2 tsp of cayenne pepper
1/2 tsp cumin

Pre-heat the oven to 450 degrees. Cut the potatoes into roughly 1 inch chunks. Cut the onion into similar size. Toss the potatoes and onions with olive oil in a small roasting dish. Lightly Salt and Pepper. Roast until golden and crisp on the outside and fork tender on the inside, about 20 minutes. Stir all the sauce ingredients together in a small bowl, adjusting seasoning to taste. Refrigerate until ready to serve. Serve potatoes drizzled with sauce, or serve sauce on the side for dipping.

Happy Eating


StumbleUpon

Friday, November 12, 2010

Caramel Corn

I love popcorn. In fact it is probably my favorite food. I love all kinds of popcorn, salty, buttery, spicy, sweet. Growing up a real popcorn treat came every summer on the Ocean City Boardwalk (that's Ocean City, NJ, not the other one). With Johnson's Popcorn. It was, is, and always will be the best caramel popcorn around. You can't go to the boardwalk without getting a giant bucket or two. I have to say though, my version came pretty close. My mom swore it tasted just like Johnson's Popcorn (although she is probably a little biased). The best part about this wonderful treat is it lasts awhile, if you store it in an airtight container. Mine was still tasty and crisp for about 2 weeks after I made it. It's super easy to make, and for some reason people will be ridiculously impressed that you made it. It makes a great party or game day snack. So cook up a big batch of delicious caramel corn for everyone to enjoy, but don't forget to save some for later.


Caramel Corn:
1/3 cup of popcorn kernals
Vegetable oil
1 cup brown sugar
1/4 corn syrup
3 tbsp of salted butter
3 tbsp of unsalted butter
1 tbsp of water
1/2 tsp of salt
1/2 tsp of baking soda

Pre-heat the oven to 250 degrees. Coat the bottom of a large pot with vegetable oil over high heat. Add the kernels and pop, covered, until the popcorn is hitting the lid, and you no longer hear the popcorn popping. Line a baking sheet with parchment paper and grease or Pam it. Pour dump the popcorn onto the sheet, removing all un-popped and partially popped pieces. In a small pot, combine sugar, corn syrup, water and butter. Bring to a boil and reduce to a simmer, continue cooking until it's a lovely golden brown and smells like caramel. Turn off heat and stir in the baking soda. In pour about a third of the mixture over the popcorn and toss with spoons, or your hand to combine (careful, the caramel is hot). Repeat this 2 more times until all the caramel is incorporated and the popcorn is coated evenly. Put the tray of popcorn in the oven and bake for about an hour, stirring every 15 to 20 minutes. Let cool slightly before serving, or putting in an air tight container for storage. (Adapted from Brown Eyed Baker)


Happy Eating.


StumbleUpon

Tuesday, November 9, 2010

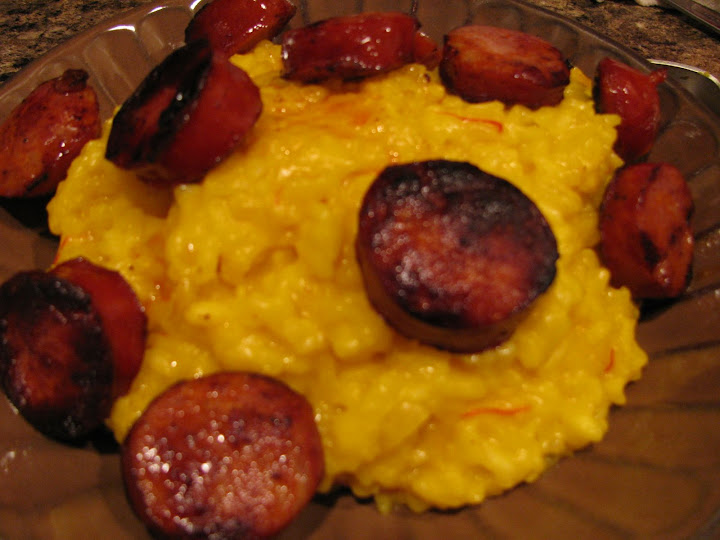
Risotto and Chorizo

The food in Argentina was so ridiculously wonderful, I knew I would have to try and recreate some of our favorite meals. Since, I am still recovering from my absolute beef overdose, and have not had a bite or even a thought of a bite of beef, since I've been back, I decided to take one part from a particularly delicious Italian meal and one part of the most deliciously wonderful street food, chorizo. It's like sausage on flavor steroids, charred and delicious. Because of the saffron in the risotto, it feels amazingly Spanish too me, with a little bit of Italian and South American flare. Risotto is a little labor intense to make (you have to stand in the kitchen while you cook it, lots of stirring, etc) but totally worth it.


Saffron Risotto with Chorizo:
1 cup of Arborio rice
1 small onion
1 medium shallot
1 tbsp of olive oil
1/4 cup of white wine that you would drink (I used a Reisling)
1 tbsp of cooking sherry
2-3 cups of chicken stock
1 tsp of Spanish saffron
1 1/2 tbsp of butter
1/4 cup of Parmesan cheese, plus more for serving
3 or 4 Argentinian style Chorizo links

In a medium pot, heat the olive oil over medium-low heat. Dice the shallots and onion and add to the pot. Cook, stirring occasionally, until onions are soft and translucent, 8-10 minutes. Warm 1/2 cup of chicken stock and stir in saffron, set aside. Add rice and cook for 4 minutes, toasting the rice (you may not notice a difference in the rice). Add wine and sherry and cook until almost evaporated. Add the saffron infused stock and stir. Cook, stirring frequently until the stock is mostly absorbed. Add an additional 1/2 cup of stock and cook, stirring frequently until almost all the liquid is absorbed. Repeat this process until the rice is creamy and tender. Add the butter and cheese to the rice and stir until melted and absorbed. Heat/cook the chorizo in a small pan over medium-high heat, you do not need to but any oil in the pan because of the fat content in the sausage, cook whole or in slices, I chose slices to get a really nice char all over the meat. Serve risotto topped with Chorizo and additional Parmesan, if desired.
(adapted from Martha Stewart)

Happy Eating.


StumbleUpon

Friday, November 5, 2010

Garlic Spaghetti and Shrimp

Back to reality. No more vacation, no more Halloween treats. A brief interlude of everyday cooking before the Thanksgiving rush happens. I am using this opportunity to try all those dinner ideas I have been craving, and all those recipes I have been bookmarking. Revamping basics and trying classic and new flavor combinations. Today I have something pretty classic for you, garlic, pasta, and shrimp. Simple, fast and delicious, it was a great way to ease myself back into everyday cooking.


Spaghetti and Shrimp in Garlic Sauce:
8 oz of spaghetti (half a box)
1 lb of shrimp, peeled and deveined
1 medium shallot
5 garlic cloves
2 tbsp of olive oil, divided
1/4 cup of sherry
1/2 of a lemon, juiced and zested
1/4 cup of Parmesan cheese
Salt, Pepper
Truffle oil (optional)

Cook pasta according to box directions. In a large skillet, heat 1 tbsp of olive oil over medium-low heat. Add shallots and garlic and cook until tender, stirring often to prevent burning, about 6 minutes. Toss the shrimp in lemon juice, salt and pepper in a small bowl and let sit. Add sherry and cook until almost all the sherry is evaporated, 2-3 minutes. Add shrimp to skillet and raise heat to medium-high. Cook stirring frequently until shrimp are pink and curled, about 2 minutes. Add The cooked spaghetti to the skillet and toss to combine. Add in additional tbsp of olive oil and cheese, toss to combine. Salt and pepper to taste, and sprinkle with truffle oil if you are using it. Serve and enjoy.

Happy Eating.


StumbleUpon

Thursday, November 4, 2010

Tastemaker: illy issimo!

Do you like coffee? I am a total addict. I drink one every morning, and sometimes as an afternoon pick me up. Sometimes though, particularly in the afternoon, I want something a little sweeter. Through the Foodbuzz tastemaker program, I received a free sample of the new illy issimo coffee drinks. They come in three flavors caffe, latte machiatto, and my favorite cappuccino. They are pretty sweet, so if you like a lot of cream and sugar in your coffee I would suggest the latte (coffee, milk, and sugar) or the cappuccino (which also has some chocolate), the caffe one is more basic coffee (with a touch of sugar).


The cappuccino was by far my favorite, it tastes like chocolate milk with coffee. It's such a little pick me up, and only a 100 calories. Here I am at my desk...


Thanks to Foodbuzz and illy issimo for letting me try their new coffee drinks! What about you, which flavor are you most excited to try?

Happy Eating


StumbleUpon

Tuesday, November 2, 2010

S'mores Brownies

Oh boy do I have something delicious for you today. I made this little treat for some Halloween festivities (which is why the brownie is on a skeleton plate) but these brownies are not specifically for Halloween. In fact, they capture the essence of one of my favorite summer treats, S'mores!!!! There is nothing like a gooey s'more around the campfire, but this is definitely a super rich and decadent next best thing. The brownie base is the richest, deepest, most chocolaty brownie I have ever made (Thank you, Martha Stewart). Then the chocolate heaven is topped with more chocolate, marshmallows and graham crackers. Yeah, these are amazing, and highly addictive, so beware...


S'Mores Brownies:
1 stick unsalted butter, plus more for pan
8 ounces of bittersweet chocolate
1 1/2 cups of sugar
4 eggs
1 1/2 tsp of vanilla extract
3/4 cup of flour
1 tsp of salt
1 cup of semi-sweet chocolate chips

Topping:
3/4 of a bag of mini marshmallows
1 cup of semi-sweet chocolate chips
4 graham crackers

Pre-heat the oven to 350 degrees. Line a 7" by 11" baking dish with parchment paper and butter or grease the paper. Melt butter and chocolate in a heat proof bowl (I used the microwave), stir together and let cool for 10 minutes. Mix in sugar and vanilla until well combined. Then add eggs and mix until the mixture is smooth. Gently fold in flour and salt. Stir until just incorporated, you do not want to over mix. Add in chocolate chips and stir gently. Pour into lined pan and bake for 35-40 minutes, until just before the brownies are done. Remove from the oven and top with marshmallows, distributing them evenly over the brownies. Then sprinkle with chocolate chips. Crumble the graham crackers into chunks and sprinkle on top. Bake for an additional 5-10 minutes until the chocolate is melted and the marshmallows are golden. Let cool for 10 minutes then use parchment paper to lift brownies out of the pan. Cut brownies according to size preference. Brownies can be stored for up to 5 days in an airtight container. Serve and enjoy. (adapted from Martha Stewart)

Happy Eating


StumbleUpon

Monday, October 25, 2010

I'm Back!!!

I am back from my wonderful, relaxing, delicious vacation. I walked, ate and drank my way through beautiful Buenos Aires. I slept in, drank wine with lunch, and ate the most wonderful grass fed beef, it was everything a vacation should be. So before I head back to reality, let me share some of my city and food highlights with you...

First, the city:


One of the many beautiful Mausoleums in the Recolata Cemetery, which is where Evita and many other's are entombed.


The presidental palace, called the Pink House:


Me at the Zoo, where you are allowed to feed the animals, very different and fun:


I could go on forever about the beautiful city, but this is a food blog after all, so here is what you need to know. 1. Eat a ton of beef, it's grass fed magic, 2. The portions are huge, but it's ok to share (we learned this one the hard way). 3. It's a whole lot cheaper than here, so live it up. And 3. The entire country (or city) has a major sweet tooth, so be prepared for lots of desserts and lots of Dulce de Leche! 4. Drinks lots of wine, especially Malbecs.

Proof of huge portions, this steak was called "medium", this was also the best steak meal we had on the trip it was from La Cabrera in Palermo.


An assorment of grilled meats, grilled on an open flame...


Finally, from Le Mistral, in the Four Seasons Hotel, which was our best and fanciest overall dining experience:

The Bread Tree, with muffin shaped bread:


My wonderful braised rabbit with a mushroom and raisin puree and polenta, and by the way, that polenta was filled with a melty, creamy Brie center. Yum!


The boyfriend ordered some more delicious grass fed beef, and that side container is full of broccoli, spinach, and thick cut bacon.


Well those are my trip highlights from wonderful and magical Buenos Aires.

Happy Eating.


StumbleUpon