Exciting news! Food wise anyways. This has somehow become a big week in cooking. On Tuesday night I made delicious chicken kebabs, that are being added to the list of regular dinners (as in dinners to repeat, often, these include, fried rice, pasta w. red sauce, etc. You know, everyday meals). Then last night I made bison burgers! They were falling apart slightly, but good and exciting. Plus the meat came to me for free. A lovely gift from some people at work who went hunting and brought back more meat than they knew what to do with. They also gave me (well the boyfriend, but me by extension) something that is called a ham, but is really a roast from the butt. I will have to investigate what to do with that. Then tomorrow night, we are hosting a homemade pizza party. I am so excited! Saturday I will be making pizzas all day. I will definitely let everyone know, exactly what gets made and how it turns out!
So the delicious chicken kebabs...
1-1.5 lbs of boneless, skinless chicken thighs (yes, you heard me right, and trust me)
1 Vidalia onion (or something similar)
1 Bell Pepper
3 Cloves of garlic
1/2 a lemon
6 Sprigs of Rosemary (soon it could be from my garden!)
Olive oil
Salt, pepper
Skewers
Pre-heat the broiler (or the grill). Chop the onion and pepper into sizable chunks and season with salt and pepper, for skewering. Dice the garlic and rosemary. Cut the chicken into largish chunks, and season with salt and pepper. Assemble skewers in the order of your choice. I did onion, pepper chicken, repeat. I needed 5 skewers for 1.2 lbs of chicken, 1 onion, and 1 pepper. Lay the skewers on the broiler pan and pour a little olive oil on the full skewers. Sprinkle (a lot of sprinkling) the rosemary and garlic on them. Squeeze the juice of half a lemon over the skewers. Broil for about 6 minutes then turn the skewers and broil on the other side for an addition 6-7 minutes until cooked through, this will largely depend on the size of your chunks. So, adjust time as necessary.
This was so delicious. I served it with Carolina's Spanish style yellow rice, which was the perfect accompaniment. The chicken was juicy and delicious. It made me wish for summer so bad though. I can't wait until it's grilling time again!
And the Buffalo Burgers...
1 lb of ground bison
1 yellow onion
3 cloves of garlic
1 egg
A bit of breadcrumbs
Salt, Pepper
Mix everything together and make into burgers. This isn't so much a recipe, as much as it is a story about how I ate bison for the first time, and I cooked it. I cooked them on a griddle pan. I had mine with mushrooms, lettuce, tomato and feta cheese, the boyfriend has jack cheese, lettuce and tomato. They tasted a lot like a regular burger with a small something you can't quite put your finger on. Not the most adventurous way to try a new meat, and I am excited to try the roast, which seems more real than eating ground meat, because really ground meat is ground meat, and the only thing that really makes a difference is fat content. Bison is similar to an 85/15 or 90/10 and that's all you really need to know.
Happy Eating.
Friday, February 26, 2010
Buffalo and chicken, not buffalo chicken.
Labels:
bison,
chicken,
cooking,
everyday meals
Wednesday, February 24, 2010
I'm Growing!
Despite the forecast of snow for tomorrow, Spring is almost here! That means it is time to build my mini green house again. Yay! So this weekend I dragged the boyfriend to Lowes (it wasn't very difficult)to buy dirt and new containers to plant all the lovely seeds and bulbs he gifted me for Christmas and Valentine's day. My herb garden will be quite plentiful this year. I sowed my seeds in one of those seed starters, with the plastic cover. It's important to keep seeds covered before they sprout so the dirt stays moist, then you just spray them with water about every other day, to keep moisture in and pop open the lid when they sprout. I planted basil, rosemary, chives, oregano, parsley, sage, and thyme. I am using My Folia to track my plants and to keep my gardeners "journal" I decided to take it digital this year, after the relative success of last year's hand written one. I also labeled the plants carefully this year, after I spent hours sorting seedlings last year when all my labels got mixed up. The herb labels are safe, for now, protected by the plastic cover, the flowers on the other hand...
I bought to giant planters to plant the lily and dahlia bulbs. They are sitting in the living room until they can go outside, and the cat loves to climb in them and take out the labels, then when you shoo him away, he slinks back over when he thinks your not looking. It would be adorable if it wasn't so annoying. It's only 2 planters, so it should be relatively easy to keep them straight. I moved the labels to outside the planters today, so Jeeves doesn't dig in the dirt (hopefully). I also planted Ranunculus, but those are safe because they are in 2 hanging baskets. I am very excited for my garden and can't wait until it begins to sprout.
I also finished knitting a lovely and warm hat for the boyfriend. I used chunky red alpaca wool and mohair, both from Loop. I started with a pattern from Martha Stewart but it wasn't really big enough, so I just kind of made stuff up/modified. My pattern was:
C.O 44 sts
K 6 Rows
K 1 Row P 1 Row for 7ish Inches, end on P.
K 3 K2tog K to end
P
K 2 K2tog K to end
P
K K2tog K to end
P
BO and leave a long tail. Pass the yarn through the BO stitches and pull tight, this makes the stitches come together and closes the top of the hat. If you have a little hole you can just sew it up as you sew up the seem. I used only the red yarn to sew up the seem and to pass through the BO stitches. VoilĂ and enjoy!
Happy growing and knitting
Tuesday, February 16, 2010
A very loving breakfast.
Before I get to breakfast, let's talk cheesecake. The cheesecake came out wonderfully. It was a ton of work, but completely worth it. I sliced strawberries to put on top. Here is the recipe again, thanks Martha. Above is a picture of my beautiful creation.
Now, breakfast. So for our lovely Valentine's day breakfast I made Eggs Benedict with homemade biscuits (a twist on your classic baking powder biscuits). For the meat, I used lean Canadian Bacon, the small thin circular kind. I ended up making 5 eggs (1 for me, 4 for the boyfriend), 8 biscuits (I used 3 for breakfast), and 10 pieces of the bacon (2 for each half), plus homemade hollandaise sauce (a recipe which I halved and modified from Williams and Sonoma, original recipe here)
First, make the biscuits:
Buttermilk Biscuits:
2 cups of flour
2 tsp baking powder
1⁄2 tsp baking soda
1 tsp salt
1 stick cold unsalted butter
2⁄3 cup buttermilk
Preheat the oven to 450 degrees. Cut the butter into small pieces. In a medium sized bowl, use your fingers to rub butter into the flour as quickly as possible. I actually used the bread hooks of my new hand mixer (which I am obsessed with)and finished with my fingers. The goal is to handle the dough as little as possible so that the butter stays cold (which creates flaky biscuits), you could also use a food processor. Add the baking powder, salt and baking soda and combine. Stir in the buttermilk until just absorbed. Lightly flour your hands and a small patch of counter. Gently mash the dough into a ball and push it out on the floured surface so that it is about 1/2 inch thick. Spray a cookie sheet with Pam. Use a drinking glass to cut out circles in the dough. Cut them as close as possible, those cut from the first roll out taste best. Re-roll dough and cut out additional biscuits, don't re-roll more than once. Trust me, they will not be good. You will be able to taste which biscuits came from the re-roll as it is. Bake for 12 minutes until golden on top. Yum.
While the biscuits are baking, you can make the hollandaise sauce...
Hollandaise Sauce
2 egg yolks
half a lemon
half a lime
1 stick of butter
salt, pepper
In a microwave, melt the butter. While the butter is melting, over low heat whisk the egg yolks and the lemon and lime juice (I again used my new mixer, with the whisk attachment) for about 3 minutes. Let both cool slightly, then combine in a bowl. Whisk together (you could also use a blender, high speed is key). Add salt and pepper to taste. If it looks to thick, you can thin it out with some water.
While this sauce is probably one of the most unhealthy things I have ever made, it is so good, and well you can't have Eggs Benedict without it. Next, we heat the Canadian bacon and poach some eggs. I cooked the bacon in the oven after the biscuits came out, it is pre-cooked so you just need to heat/caramelize it. To poach eggs, I like to use a big pan, with decently high sides. Fill it with water and bring that water to a consistent simmer. Crack eggs and drop in. At first I would recommend doing one at a time, but as you get better at it, you can do 2 or 3 at a time. The trick is to keep the water at a consistent simmer. The eggs will need about 4 minutes each to cook.
To assemble the whole thing. Cut a biscuit in half. Place 2 pieces of Canadian bacon on each side. Top each one with a poached egg and a few spoonfuls of hollandaise sauce. Serve and enjoy your decadent, savory, and truly delicious breakfast.
Happy Eating
Sunday, February 14, 2010
My Favorite Dinner
Happy Valentine's Day friends. This morning I woke up to roses, that boyfriend is so sneaky, and sweet. Lots and lots of cooking going on. Last night I made my absolute favorite dinner of always. It is any kind of lamb with yogurt sauce (we had lion chops last night), tuscan salad and rice (well the rice isn't really a favorite or a special it's really just the lamb and the salad). It is so good. I also made a very pretty and pink strawberry cheesecake, here is the recipe, from Martha, of course. Then this morning I made a very special 100% homemade eggs benedict, but you are going to have to wait for my next post for that. Yesterday, I also bought a very amazing, hand mixer (the Cuisanart 9 speed) at my favorite store, Williams and Sonoma. I have already used 3 of the attachments and I am completely obsessed! Here is how you make my favorite dinner, stay tuned for my favorite breakfast...
Lamb (for 2):
1 lb of Lamb lion chops, bone in
1 handful of rosemary, chopped.
1 handful of thyme
Salt, pepper, garlic powder
Pre-heat the boiler. Coat the chops in chopped rosemary, thyme, salt, pepper and garlic pepper. Put on a broiler pan and cook on one side for 6 minutes, flip and cook for 3-4 minutes on the other side. Lamb will be medium rare. That's it. Alternatively, this tastes amazing grilled in the summer.
Yogurt Sauce:
1 6 oz container of low fat (or fat free) Plain yogurt
1/2 a lime
1 handful of fresh mint
Salt, Pepper
If you have a muddler (we do since Christmas!) use that to muddle the mint and lime juice (think mojito with no sugar) if not chop the mint as small as you can. Mix the yogurt, mint and lime juice. Add salt and pepper to taste. Refrigerate until serving.
Tuscan Salad
1 container of cherry tomatoes (or regular tomatoes, if they are in season)
1 cucumber
1/2 a red onion
1/2 Lime
Salt, Pepper
1/4 a baguette, day old or fresh
Feta Cheese
Cut the cherry tomatoes in half, or give tomatoes a rough chop. Cut cucumbers and onion into roughly same size pieces. Mix all the veggies in a bowl. Salt and pepper to taste. Squeeze lime juice over the veggies and toss. Thickly slice the bread and toast/heat in the oven/on the grill. Rip the bread into pieces around the size of the veggie (or you can cut the bread). Approximately 5 minutes before serving add bread and feta to the salad and toss to combine. The bread absorbs the juices. Absolutely delicious.
Well there you have it, my favorite dinner. Hands down. It is so simple to make and so delicious. In the summer when tomatoes are so succulent this is incredible, but in the winter if you can find good cherry tomatoes, it is almost as magical. It is the perfect meal to enjoy with a nice red wine or mojitos (or both, which we did last night).
Well that's all for now, but stay tuned after my lovely Valentine's day I promise I will discuss cheesecakes and a breakfast made with my very own homemade biscuit recipe.
Happy Eating
Friday, February 12, 2010
Snowed in Roasting
Tuesday night in anticipation of the third epic snow storm of season I went to the market (not quite as pre-apocalyptic as I expected) and what happened to be on sale?! The most beautiful, perfect, 2 and a half pound boneless ribeye roast. What could be more comforting and delicious on a cold winter, snowed in day. We lost power on Wednesday, which threatened to ruin dinner, but fortunately it came back on in time for me to roast. The roast was so delicious and succulent. And with all things roasting (perhaps why it is my favorite method of cooking) it is so simple to do, and tastes like a full days worth of effort. Here is my recipe:
Ribeye Roast:
2.5-3 Lb Boneless Ribeye Roast
1 Large Yellow Onion
3-4 Cloves of Garlic
4-5 Sprigs of Fresh Thyme
2-3 Tbsp of Brown Sugar
1 Cup Beef Stock
Salt and Pepper
Pre-heat oven to 450 degrees. Give Onions a rough chop (very large pieces) and throw in the bottom of a small roasting pan (I used a small Pyrex one, so The higher sides would keep the juices from spreading). Peel the garlic and smash a bit, throw in pan in large chunks. Salt and pepper the roast on all sides and sprinkle with thyme. Rub brown sugar onto the meat, and put the meat in the roasting pan. Put in the oven and roast for 20 minutes. Then turn heat down to 325 degrees and pour beef stock over meat and onions. Make sure the onions are not stuck to the bottom of the pan. Roast an additional 25-35 minutes (depending on how rare you like your meat). Let stand covered 10 minutes before serving. Use the onions and drippings as gravy if desired. Serve and enjoy.
Like I said before this was wonderfully delicious and comforting. I served it with garlic steamed broccoli and there were no leftovers (and only 2 of us). Roasting in the middle of the week felt so decadent, but as I will miss my Sunday roasting because it is Valentine's Day (and I am being taken out) I'm glad I got my chance. I will be making Eggs Benedict for brunch on Valentine's Day and also making a strawberry cheesecake (assuming I can find worthy berries). So until then...
Happy Eating
Wednesday, February 10, 2010
Blanket!!!!
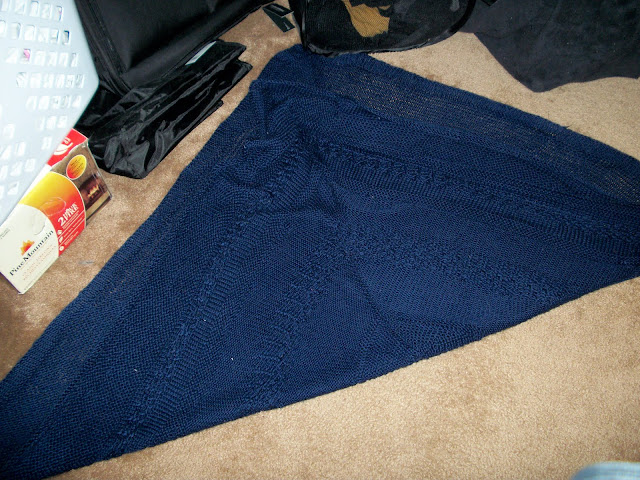
Tad-dah! The blanket is finished! I feel so accomplished. I ended up making it a bit larger than the pattern called for and adding a small garter section to the outside, which may not have been the greatest idea because it has a tendency to roll, but I love it anyways. It is so pretty. Right now it is drying in the closet, so the cat doesn't get it (please excuse the laundry and shoes, but it is a closet). Jeeves loves the knitting so much, he keeps trying to attack the needles and poke his whiskers in the yarn. Very cute, and very annoying. So my next knitting project is a hat, and I am half way done, but I ran out of yarn and I had to order more. So after that, my plan was to make a baby hat and booties for my cousin whose is expecting (well for baby boy no name). So while I was snowed in, I needed to knit, I decided to "practice" the booties with the left over blanket yarn. Then after I made one and I just kept going and now I have four. The boyfriend and I tried put the booties on Jeeves. Kitten mittens anyone? He wasn't having it, but the booties are adorable, I can't wait to make them in the real yarn (which is a baby blue super soft light weight merino-cashmere blend). Happy knitting!
Wednesday, February 3, 2010
Chicken Tales
On Monday, I made the best roast chicken of my life, and realized I have no idea how those pop out thermometers work or how to tell if a chicken is done. I should probably invest in a meat thermometer, that at least I could operate.
The skin was crispy perfection, the meat was juicy and tender, and the gravy was lemony and delicious. However I took the chicken out like 30 minutes before it was done, because I temporarily lost my mind, and also because I cannot tell when the little white thing has popped. So the end result had some deep gashes in it from checking to see if the meat looked raw, but I make shift patched them with onions, and the chicken turned out really well. I served them with the potato hash I made last week (that I had ridiculously paired with tuna) and spicy sauteed green beans. My inspiration for this chicken was The Barefoot Contessa's "Engagement Chicken" I was watching the show at the gym, earlier in the day and she informed me that if you roast lemon pieces in the bottom of the pan they become edible, rind and all. Now, after tasting them, I have to disagree that you would want to eat them, particularly the rind, however they made the drippings so delicious that I will definitely be putting them in again.
Roast Chicken:
1 whole chicken
3 cloves of garlic
1 large yellow onion
2 lemons
Fresh Thyme
Olive Oil
Salt, Pepper
1-2 cups Chicken Stock
Cut the lemons into quarters, reserve half a lemon for inside the chicken and cut the other half into smaller pieces (not to small) and put in the bottom of a roasting pan. Give onion a rough chop and save a couple of pieces for in the chicken and toss the rest in the bottom of the pan. Salt and pepper the onions. Wash the chicken and remove innards. Pat dry. Stuff chicken with lemon, thyme (a good amount), and onion. Salt and Pepper the chicken, inside and out. Pour some olive oil on the skin. Roast the chicken at 425 degrees for 20-30 minutes, when the onions look like they have begun to burn pour some stock in the pan. After another 20 minutes baste the chicken with additional stock and lower heat to 350. Continue cooking, basting as necessary and cover with tinfoil if the skin starts to darken too much. Let rest 10-15 minutes before carving. Serve with the drippings from the pan (which are lemony delicious) and onions and if you are brave enough to try it, the cooked lemon.
Happy Eating!
Labels:
cooking
Subscribe to:
Posts (Atom)